| Auxiliary
Lighting Page 
I have install
auxiliary lights on my 4Runner. Look below for the
types of lights and an explanation on how they were
installed:
It
burned out while I was taking the picture, go figure.
Catz
Fog Lights
I did a lot of shopping for fog
lights before deciding on Catz MSX fog lights. They simply appear to be a higher
quality light than the PIAAs and many others.
I installed them by cutting
away part of the original plastic fascia on each side
of the license plate. I have since installed a Performance Products spoiler and had cut openings in the
fiberglass to install the lights.
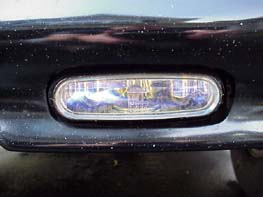
I wired them so that they will
activate when I turn on the parking lights. The fog
lights are controlled by a Toyota OEM switch
installed in one of the cut outs in the dash.
The Catz lights put out a very
bright, wide beam that really lights up the road
during bad weather. I am very happy with my decision
on the Catz MSX fog lights.
Back to Index
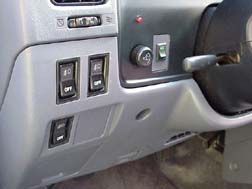
The
left switch operates the driving lights. The right
operates the fogs. The lower one disables the
daylight running lights if needed. The switch on the
right currently with the gray background is the
master switch for my ECM package.
I ordered OEM
rocker switches to control my lights from Performance Products.
Goodwrench
Day Time Running Lights
I was disappointed that my 1996
4Runner did not come with daytime running lights. I
travel on a rural highway everyday and have had
several near misses with people pulling out in front
of me. I decided to install daytime running lights
for added safety.
I shopped around and decided on
the GM Good Wrench kit. This kit is available at GM
dealers for retrofitting on vehicles without daytime
running lights. The control unit is about the size of
a pack of cigarettes. I mounted the control unit
behind the battery on the inner fender wall. There
are several wires that need to be connected:
- Positive side of
the battery.
- Ground.
- Low beam
headlight.
- 12 volt ignition
hot.
- Parking brake
switch.
- Parking lights.
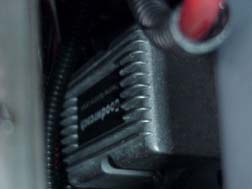
It
is mounted behind the battery on the inner fender
wall.
The unit will provide about 7
volts to the low beams. This reduced voltage reduces
the load on the electrical system and extends the
life of the low beams. I also decided to install a
separate switch so I can deactivate the system if I
choose. The unit will activate the low beams at the
reduced voltage about 10 seconds after starting the
vehicle.
The unit will shut off the
headlights if the parking brake is set or the parking
lights are turned on. The latter is for those of us
that have to go through guarded gates like at
military bases and you are required to shut off the
headlights to be identified. All you have to turn on
your parking lights or at night turn off your
headlights and leave the parking lights on.
While connecting to the low
beams I did discovered that the headlights on the
4Runner are set up much different than most domestic
vehicles. It appears that when you turn on the
headlights a relay is tripped and it supplies 12
volts to both the low and high beams. The switch is
on the negative side of the circuit. The installation
manual included instructions on how to install the
unit on the Japanese made GM cars. Apparently they
all use this goofy set up. You have to remove the
high/low beam switch and cut a wire on it. Then
install a diode to prevent the unit from powering the
high beam lights if the high/low beam switch is set
to high beam. I did not complete this step. When the
unit is active and my low/high beam switch is set to
high beam the unit will power the high beams. So I
have to be careful to leave the switch in the low
beam position.
Since installing the unit the
incidents of people pulling out in front of me has
been greatly reduced. Also as a side benefit, those
left lane bandits tend to move out of the left lane a
little sooner when I come up behind them, but not all
of them.
I am convinced that day time
running lights is a safety feature that everyone
should have installed on their vehicles. If it
prevents one accident it is more than worth it. Many
countries now require daytime running lights and
since they have been required they have realized a
30% reduction in accidents. This is about the same
reduction in accidents involving motorcycles in this
county when headlights where required to be on all of
the time.
Back to Index
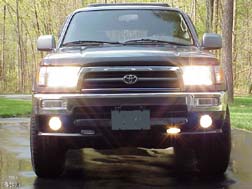
Hella
Driving Lights in Performance Products Spoiler
Have you ever wanted more light
when zipping down a country road at night? I decided
that more light would be nice. I ordered the front
spoiler with the Hella H3 driving lights from Performance Products.
I dry fitted the spoiler and
lights to make sure everything fitted correctly. I
then removed the spoiler and had it painted satin
black. This is the same color as the "B"
pillar between the front and back windows.
Note
the chipped paint from road debris.
Installing the spoiler is not
very difficult. All you have to do is line it up and
drill some mounting holes and bolt it to the bumper.
I removed the bumper and attached the spoiler to it
and them reinstalled it as one unit.
The hardest part is getting the
lights aimed properly. They are installed to the
spoiler using special brackets and "J"
nuts. The "J" nuts allow the lights to be
moved into position and when you get them aimed
properly, just tighten everything down.
Remember that these lights can
only be operated when it is legal to operate your
high beam lights. The lights should be wired so that
they can only be activated when your high beams are
on. The very best place to tap the source wire into
is into the wire bundle that comes out of the right
side of the steering column. To access this bundle of
wires remove the lower dashboard panel beneath the
steering column. Use a circuit tester and poke
through the insulation of the wires until you find
the wire that is hot when the high/low beam switch is
in the high beam position and when the switch is
flashed. I have found that the color code of the wire
is not the same for every model year so you will have
to hunt for it. Do not touch the wires that are
covered with yellow heat shrink or yellow loom wrap.
Those are the air bag wires.
When you find the proper wire
splice into it and run it to your dash switch. Run
the wire from the switch to your relay. This way you
can leave the switch in the one position and the
driving lights will activate whenever you activate
your high beams. If you decide to deactivate your
driving lights, just turn the switch off.
I installed the PIAA H3 Super
White bulbs in the driving lights. Now when I drive
down a dark country road I can throw more than enough
light down to road to blind those suicidal deer. They
also come in handy to give those left lane bandits a
reminder to get out of the left lane when faster
vehicles approach from the rear.
I get all kinds of compliments
on how well I can light up the road and how nice the
spoiler and lights look on the vehicle. I have
noticed that road debris is chipping the paint on the
spoiler. I am considering repainting the spoiler
using a chip resistant paint in body color. Ron did
this on the spoiler he installed on his 4Runner. His
really looks nice.
Back to Index
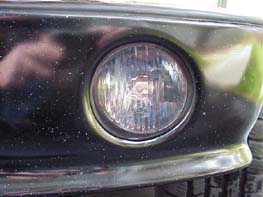
PIAA
Super White H4 Headlights
I installed the PIAA Super White H4 head light bulbs. I put
one in and left a stock in the other side to make a
comparison. The PIAAs are much brighter and give off
a very white light. They make the stock lights look a
dingy yellow.
The PIAA Super White lights are
much more expensive than the stock lights, but once I
drove at night with them I will never use the stock
lights again. The best price I have found is from DSI
Mobile Electronics in Laurel Maryland. I get them for
$60 a pair. I do recommend that if you decide to get
them, buy two packs that way you will have a spare on
hand. These lights are very popular and may be hard
to find when one of yours burns out.
Back to Index
OEM Clear Turn Signals
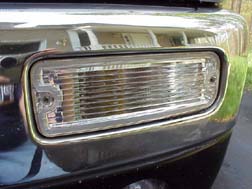
I normally do not like those so
called clear replacement lenses folks are going nuts
over. Most of them are not clear, but just colorless.
Ron got
some OEM turn signals that he installed in his
bumper. They are imported by JAOS/Winnax. These are different than what you
normally see. The look very nice and appear to be a
very high quality. I thought about it for a long time
and decided to get them. Performance Products had
them in their catalogue for about $60. I gave them a
call. The order taker promised me that they were the
same ones that JAOS imported so I placed my order.
The package arrived and they
were not the same. They look just like the stock
lenses, but without color. I called them up to
arrange to send them back. Initially they refused to
let me send them back. I explained that they are not
the same as the picture they have in their catalogue
and told them to check their records to see how much
stuff I have ordered from them. I told them that if
they did not take them back I would never order
anything from them again. Of course there is nothing
left for me to buy. They agreed it was their error
and told me to send them back.
I then ordered the right ones
from JAOS. I had to special order them. They no
longer stock the OEM ones and are now stocking the
same crappy ones that Performance Products is
selling.
I really like the quality of
these OEM lights.
Back to Index
|